
Both beginners and experts can enjoy books.

Prevents bleed-through and protects every design.

Every design is created by skilled human artists.

Trusted and loved by coloring fans worldwide.
Color Your World with Bogiki! Join the Bogiki community on social media and connect with other coloring lovers. Share your masterpieces, discover new designs, and get exclusive access to giveaways, updates, and more! Follow us on platforms as we spread joy and creativity together!
You have questions? We're here to help.

Fuzzy Buddies is an enjoyable coloring book. I love seeing the pages come to life after coloring. Great buy.
Amazon customer
I bought this for my fiance and she loves it! It's adorable and she says it's fun to draw. I love it! It also came in a day early!
Amazon customer
Such a cute and fun book to color. I can't put it down! I love how easy they are.
Amazon customer
This book is a gem: the drawings are very well done, clear and realistic. The scenes are very varied. Well suited for coloring with alcohol markers in this case. I recommend +++
Amazon customer
This colouring book is so cute! The line art is black and thick which is ideal for colouring with alcohol markers. The designs are all super cute! There are pages in this book that I haven’t seen in other books. I recommend 👍
Amazon customer
I caved and joined in the cute Halloweeny colouring bandwagon! I'm happy with this book, it's so cute! I like the size, it's not too big so it's easier to complete. Very cute designs. The paper is thinner than I'd like but it's okay if you put card behind the page you're working on.
Amazon customer
What a dream to have a pleasant time at any age coloring these very funny drawings. Really I recommend it feels good and relaxing as much as possible doing mandalas for those who like it.
Amazon customer
I bought it for my grandma so she wouldn't be bored this winter, she loves everything related to the fairy world, goblins etc... The designs are very cute and varied! The leaves look fine so in my opinion it is not made for people who have alcohol markers.
Amazon customer
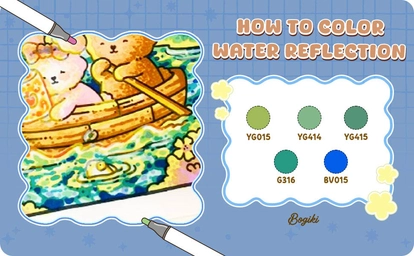
Bring your artwork to life with our water reflection tutorial designed for relaxing and creative coloring. This step-by-step guide will help you master simple yet stunning reflection effects with ease. Start your artistic journey today and discover how Bogiki can inspire your next masterpiece!
To achieve a stunning water reflection effect, choosing the right coloring tools is essential. Below are some recommended options that work beautifully for this technique:
This water reflection tutorial is designed to help you bring depth and serenity to your artwork. With Bogiki’s complete guide, you’ll learn how to create soft, natural reflections that enhance every detail of your scene. Follow these simple steps to transform your coloring into a beautiful, lifelike masterpiece.
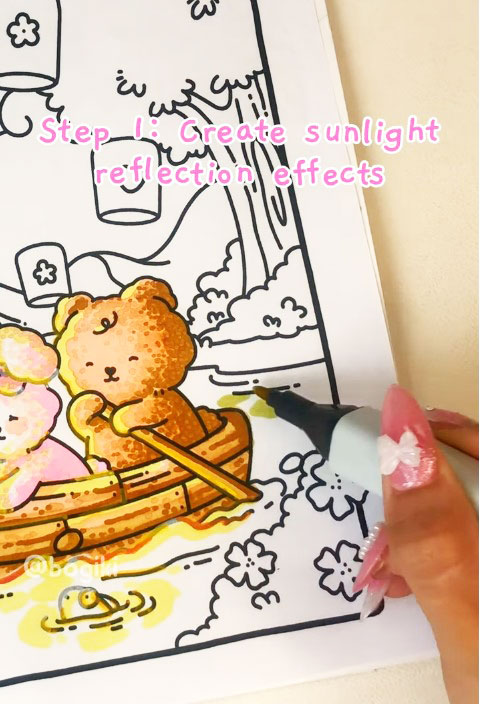
Start by building the foundation of the water reflection using gentle sunlight tones. Use the YG015 marker to softly layer color in the areas where sunlight would naturally hit the water. Focus on light, smooth strokes to keep the effect natural and bright. This base will make the following colors blend beautifully and create a warm glow.
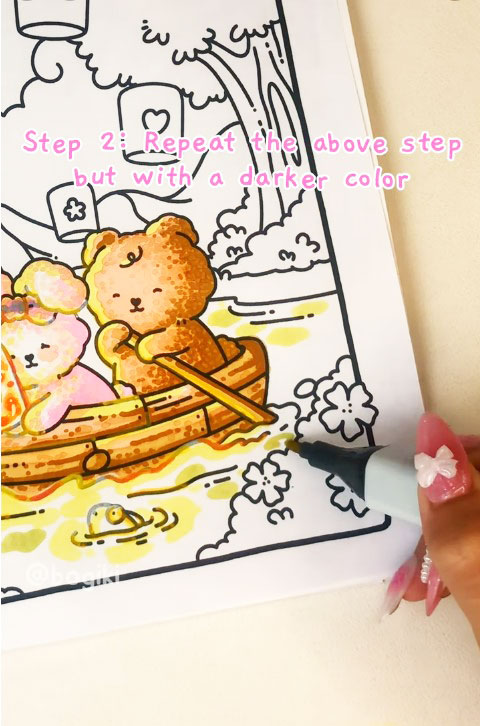
To enhance the contrast, repeat the first step but switch to a slightly darker tone, such as YG414. Apply this color in areas that need more depth, especially around the edges of the lighter tones. Blend it carefully to avoid harsh transitions, maintaining a soft gradient. This step will give your reflection a more realistic, multi-dimensional look.
To enhance the contrast, repeat the first step but switch to a slightly darker tone, such as YG414. Apply this color in areas that need more depth, especially around the edges of the lighter tones. Blend it carefully to avoid harsh transitions, maintaining a soft gradient. This step will give your reflection a more realistic, multi-dimensional look.

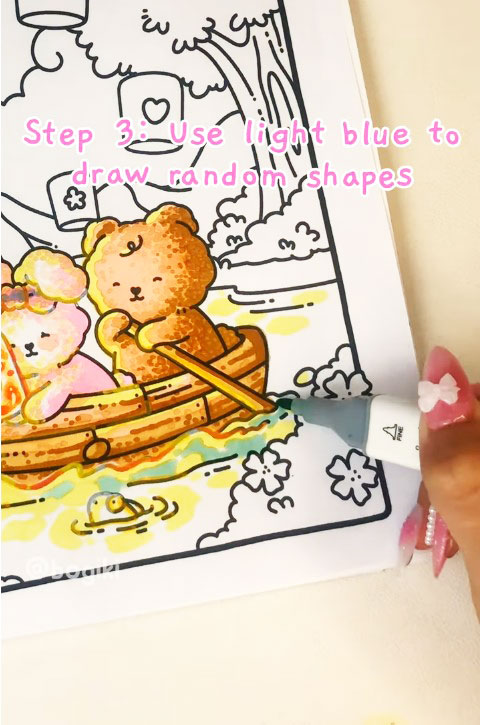
Next, use a YG415 marker to add random shapes that mimic the natural flow of water. These shapes should be irregular and scattered, adding texture and movement to the surface. Keep the strokes light and avoid uniform patterns to maintain a natural look. This layer sets the base for the blue tones that follow.
Now, enhance the water’s depth by incorporating darker shades of blue like G316 and BV015. Apply these colors over and around the light blue shapes, blending them smoothly to create depth and shadow. Use soft, curved strokes to mimic the natural movement of water. This step adds richness and balance to the entire reflection.
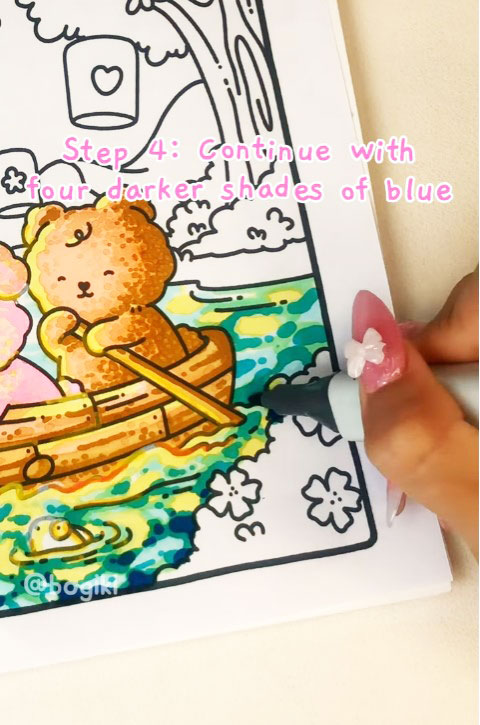
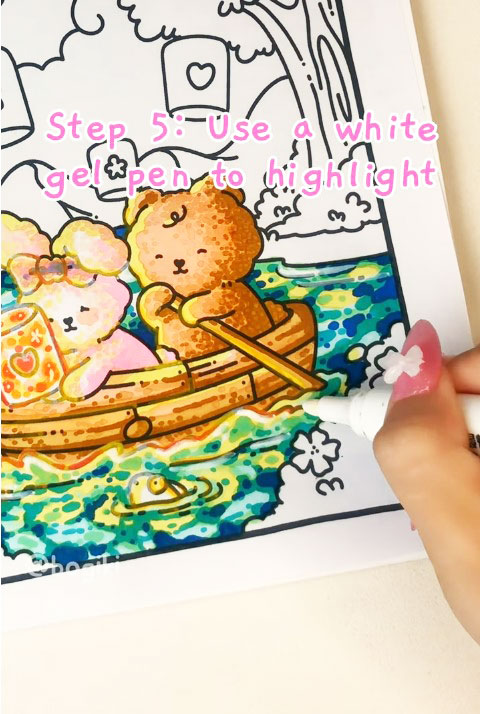
Finally, use a white gel pen or acrylic pen to add highlights to the brightest spots of the water reflection. These small touches create a shimmering effect that brings the entire scene to life. Focus on edges or areas where the sunlight hits directly. This finishing step adds realism and gives your artwork a polished look.
Immerse yourself in the enchanting world of Romantic Vibes by Bogiki, a coloring book filled with 40 heartwarming illustrations that celebrate love and connection. From tender moments to scenes inspired by beloved romantic movies, each page is designed to spark creativity and bring you relaxation. With soothing, single-sided designs and a convenient 8.5 x 8.5-inch size, this book is perfect for coloring anytime, anywhere. Let your imagination flow and create your own timeless love stories!
👉 Buy the Romantic Vibes Coloring Book and enjoy coloring now!
👉 Watch the full real-time video and see water reflection coloring detail now!
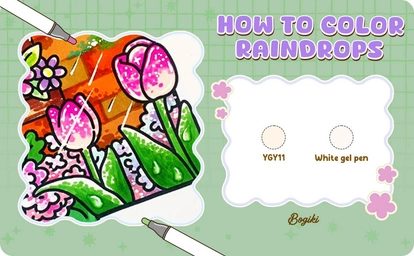
Discover how to make your artwork pop with this coloring raindrops tutorial below using markers by Bogiki. With simple techniques, you can bring depth, shine, and a fresh rainy-day vibe to every page. Don’t wait—grab your markers and follow this guide to create stunning, vibrant effects today!
To achieve beautiful and realistic raindrops in your coloring artwork, choosing the right tools is essential. Below are some highly recommended options you can use:
If you want to add a magical touch to your coloring pages, raindrops are the perfect detail to bring life and freshness to your artwork. In this step-by-step guide to coloring raindrops tutorial by Bogiki, you’ll learn simple yet effective techniques to create realistic drops with just a few tools. Get ready to transform your pages into vibrant, rainy-day masterpieces!
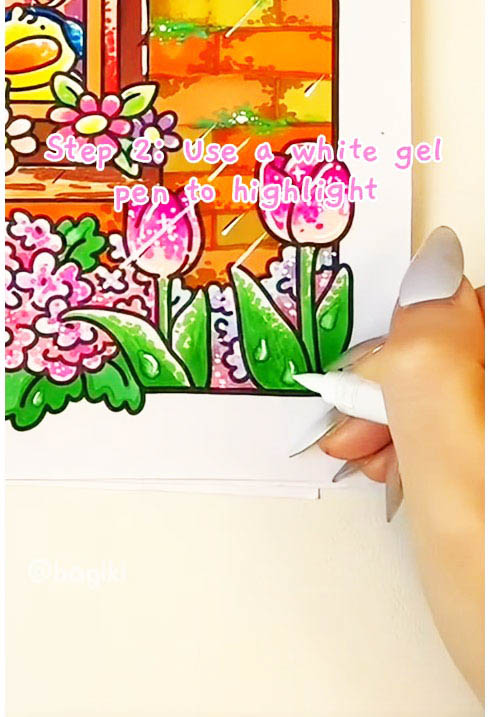
To begin, start by sketching small water droplets on the surface of any colored object you want to enhance. Using a soft white shade, such as YGY11, will help create the base of each droplet. Place the drops randomly or along the natural curves of the object to make them look natural. This base layer will serve as the foundation for creating a realistic raindrop effect.
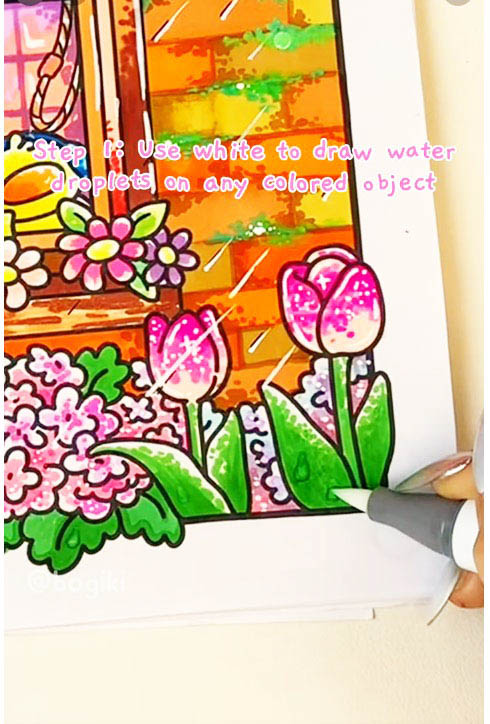
Once you have the base shape, it’s time to bring the droplets to life by adding highlights. Use a white gel pen or acrylic to carefully draw tiny reflective lines or dots on each droplet. These highlights mimic the way light hits water, making your raindrops look shiny and three-dimensional. Take your time with this step to achieve a polished, natural finish.
This charming book is filled with adorable, hand-drawn fuzzy friends celebrating the magic of spring. Each illustration is designed to help you unwind, spark your creativity, and bring joyful scenes to life. With 40 calming springtime designs, single-sided pages to prevent bleed-through, and a convenient 8.5 x 8.5-inch size, this coloring book is perfect for moments of mindfulness wherever you are.
👉 Buy the Spring Moments Coloring Book and enjoy coloring now!
👉 Watch the full real-time video and see the coloring raindrops tutorial detail now!
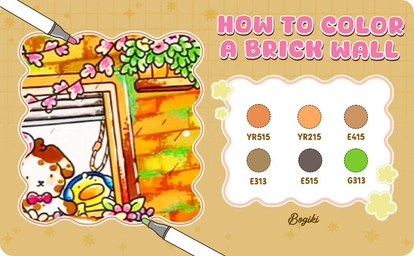
The mossy brick wall in Bogiki’s artwork evokes a warm, poetic, and lively atmosphere. In this tutorial, you’ll discover how to color a brick wall step by step—blending soft tones, adding floral accents, and playing with light to create depth and charm. Let Bogiki guide you in bringing each brick to life and turning the scene into a vibrant, heartwarming masterpiece of your own!
To bring a brick wall to life with color, you’ll need to prepare a few tools, such as markers and colored pencils, including:
Each rustic brick in the illustration comes to life with warm tones and soft green moss, adding depth and emotion to the scene. Understanding this charm, Bogiki will guide you through each simple yet inspiring step to color the brick wall in a gentle, dreamy style. Gather your tools and get ready to bring every detail to life with your own creative touch!
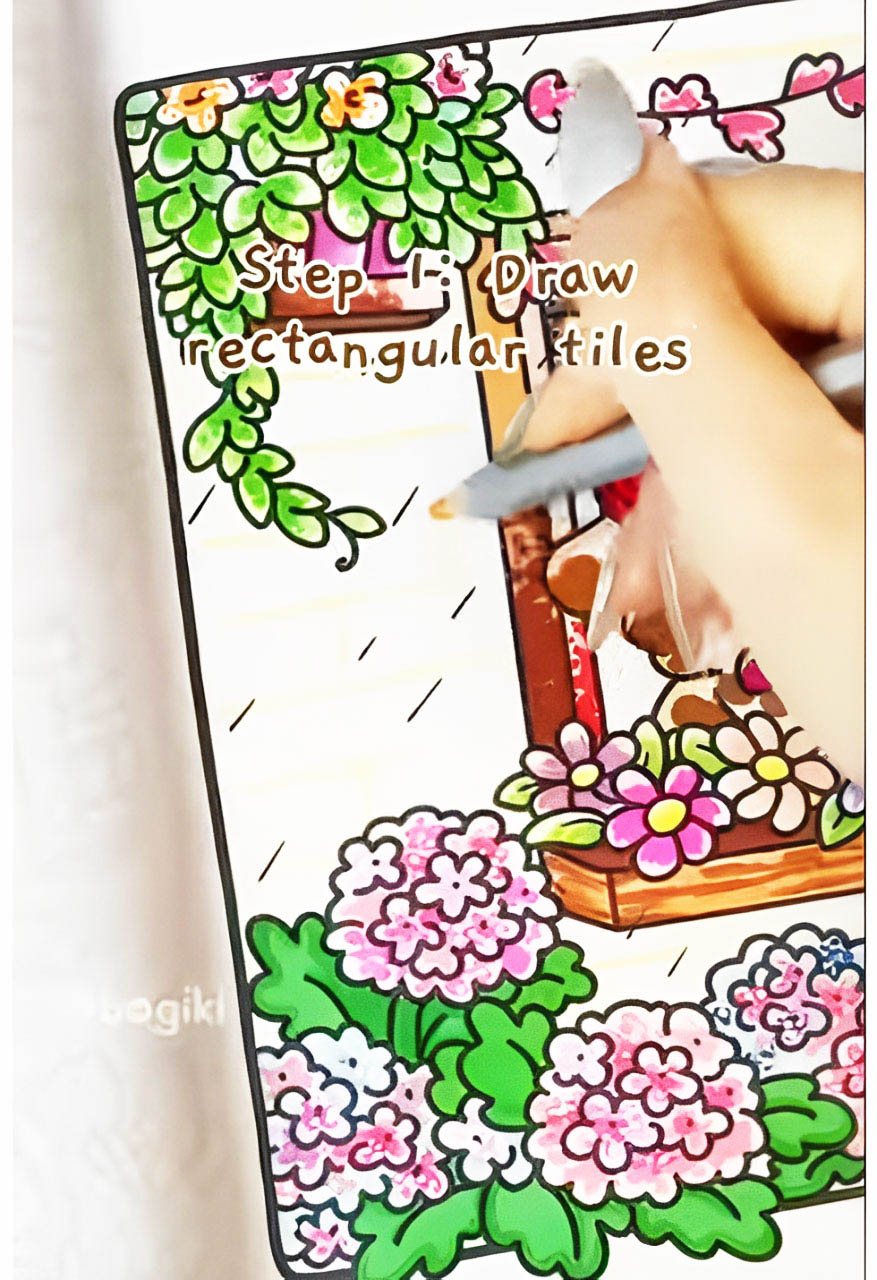
Start by sketching out the basic brick wall layout using simple rectangular tiles. Keep the spacing even to create a natural brick pattern. You don’t need to be too precise, because slight imperfections add character. Use a colored pencil, such as Ohuhu 76, to gently outline the shapes.
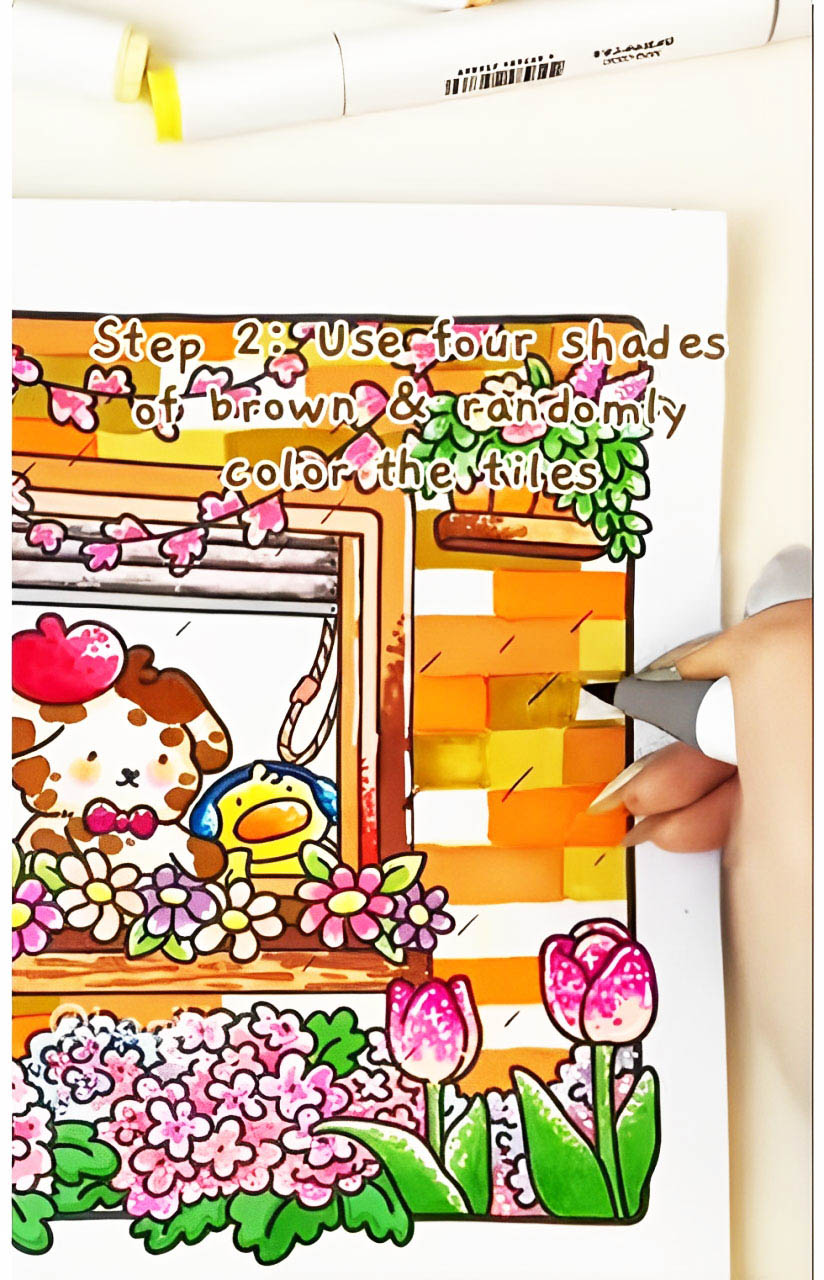
Next, bring the bricks to life by coloring them in with a mix of four brown shades. Randomly alternate between YR515, YR215, E415, and E313 to create variety and texture. Make sure no two bricks side by side share the same tone. This gives your wall a more realistic and organic appearance.
To make each brick stand out, outline the edges using a dark brown marker. We recommend using Black Brown E515 for strong yet soft definition. Carefully trace the borders of each tile to emphasize their shape. This step helps give structure and depth to the overall wall.
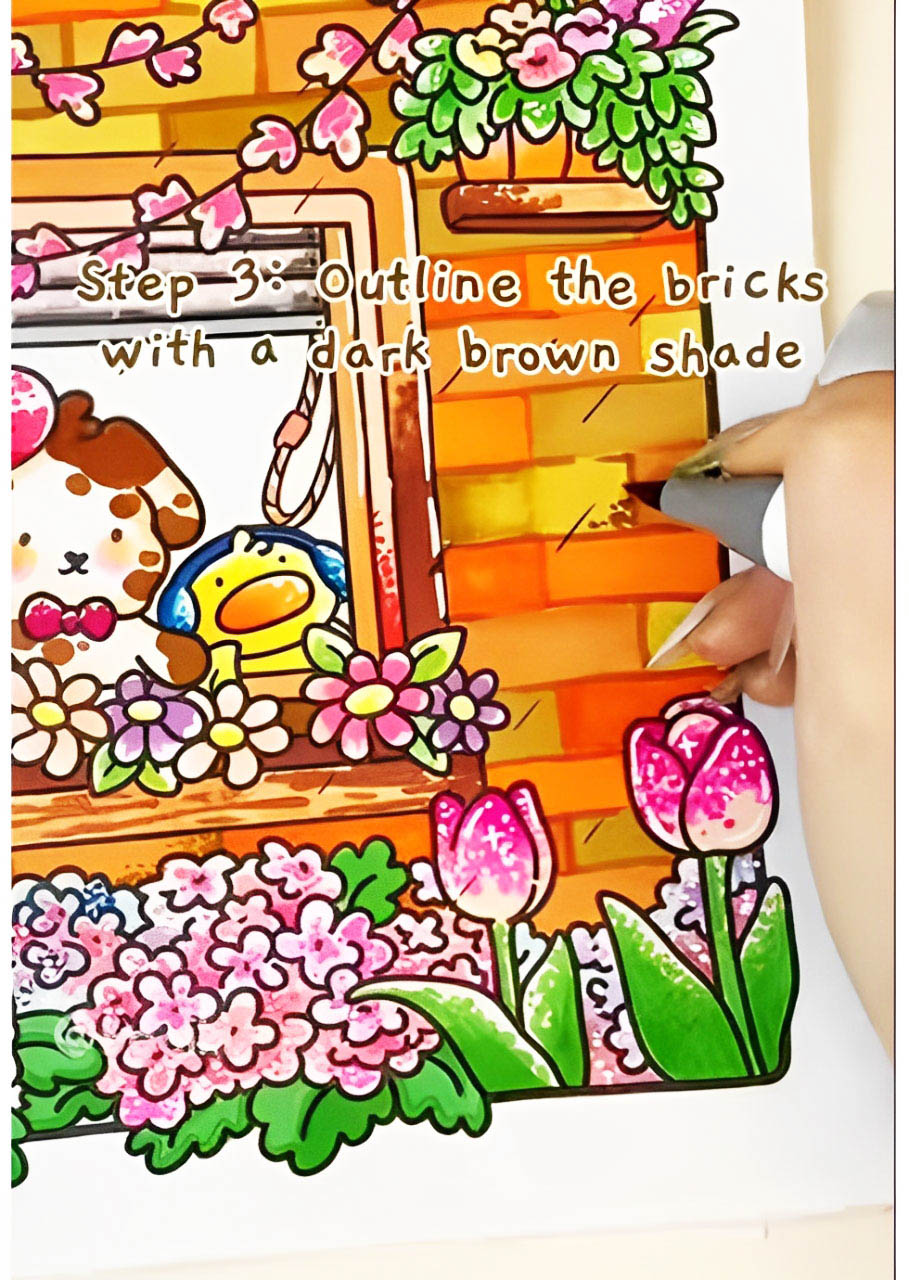
For a bit of rustic charm, use the same Black Brown E515 to dot randomly across the surface of the bricks. These tiny marks mimic natural imperfections like pores or weathering. Scatter them sparingly to avoid clutter. The goal is to enhance the texture without overpowering the coloring.
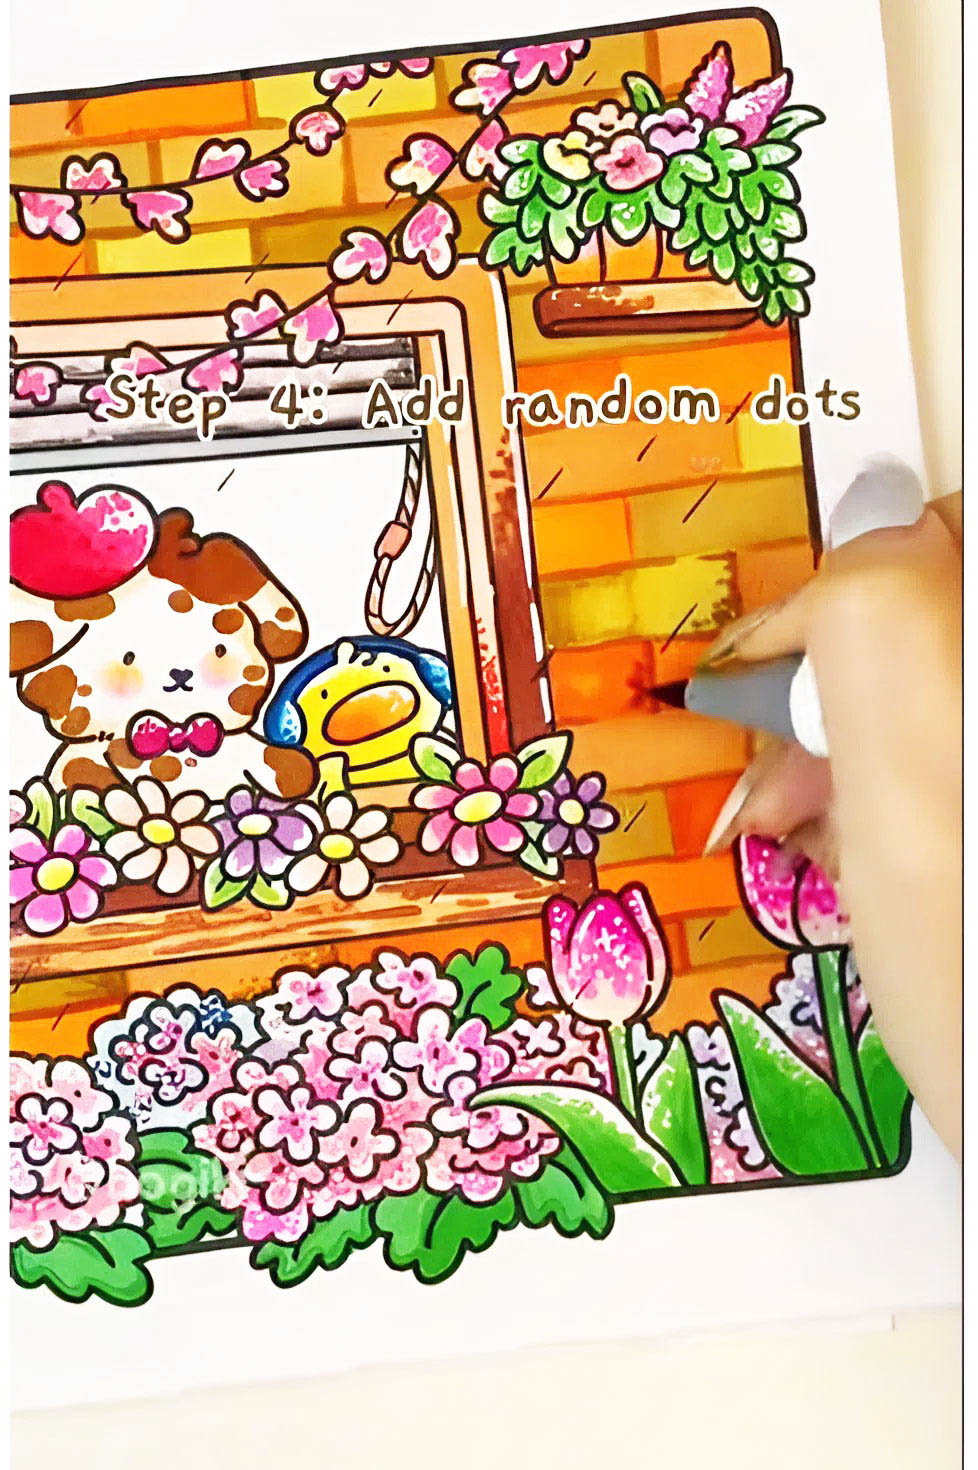
Finally, add a touch of nature by using a Green Marker Ohuhu G313 to apply small, scattered dots. Focus on corners or the base of bricks where moss might naturally grow. This soft green touch brings warmth and a lived-in feel to your wall. Don’t be afraid to experiment with density for a more organic effect.
Bloom into Relaxation with Spring Moments: Fuzzy Buddies Coloring Book – a delightful coloring book that brings gentle relaxation through the charm of adorable fuzzy friends in vibrant springtime scenes. Each page is a sweet little world where you can unleash your creativity and let everyday stress melt away.
Featuring 40 hand-drawn, inspiring illustrations, this book invites you on a colorful journey alongside cute animal companions enjoying peaceful moments in nature. The calming designs help soothe your mind, and each page is single-sided to prevent bleed-through, making it perfect for all types of coloring tools.
👉 Buy the Spring Moment Coloring Book and enjoy coloring now!
👉 Watch the full real-time video and see how to color a brick wall detail now!

Bringing a touch of nostalgia into every stroke, this vintage wall coloring tutorial from Bogiki will guide you into a retro-inspired world of colors. With clear and simple step-by-step instructions, you'll be able to complete your coloring piece with charm and ease. Grab your markers, and let’s dive into this fun and creative coloring journey today!
Here are some recommended markers to bring your vintage wall coloring tutorial to life with smooth blends and charming retro vibes:
Discover how to color a vintage-style wall with ease through the step-by-step guide below. With simple techniques and soft tones, you'll create a warm, nostalgic retro scene. Let’s begin this easy vintage wall coloring tutorial now!
To start your vintage wall masterpiece, begin by filling in the entire background with a soft, light brown tone. The recommended color for this step is Y416, which creates a warm and cozy base. Use smooth, even strokes to ensure the background appears clean and consistent. This layer sets the tone for your retro-inspired look.
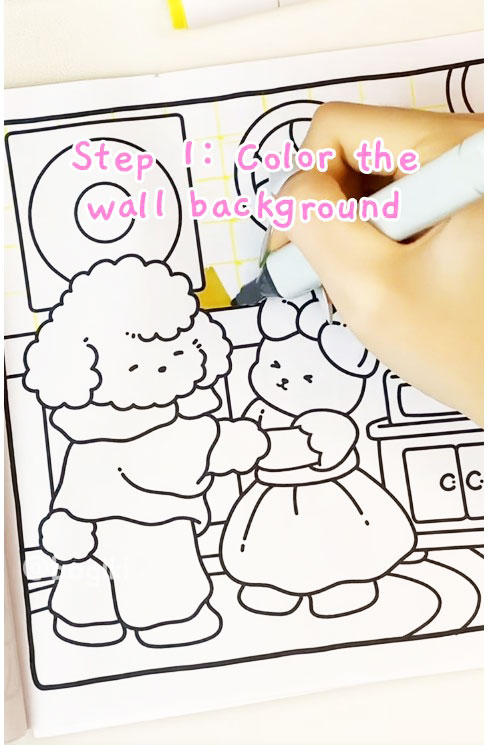
Next, add depth to the wall by drawing straight vertical and horizontal lines using Cedar brown E415. These lines help mimic the structure of vintage wallpaper or tile designs. Try to keep the spacing even to create a balanced, organized pattern. The contrast between the base and these lines will start to give your wall a charming retro texture.
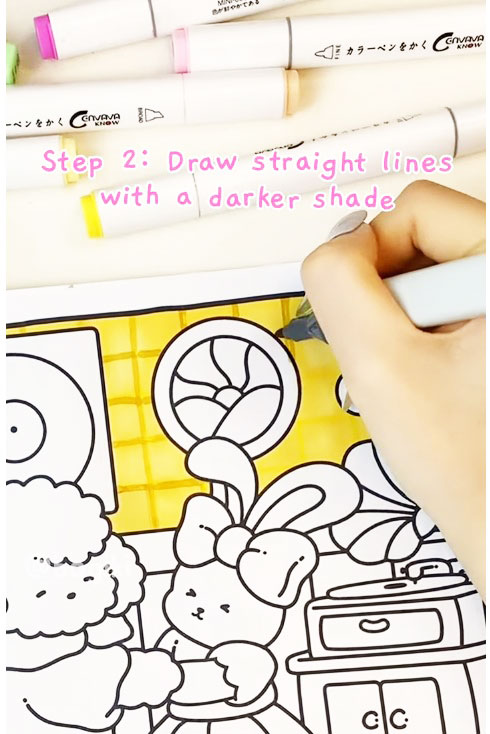
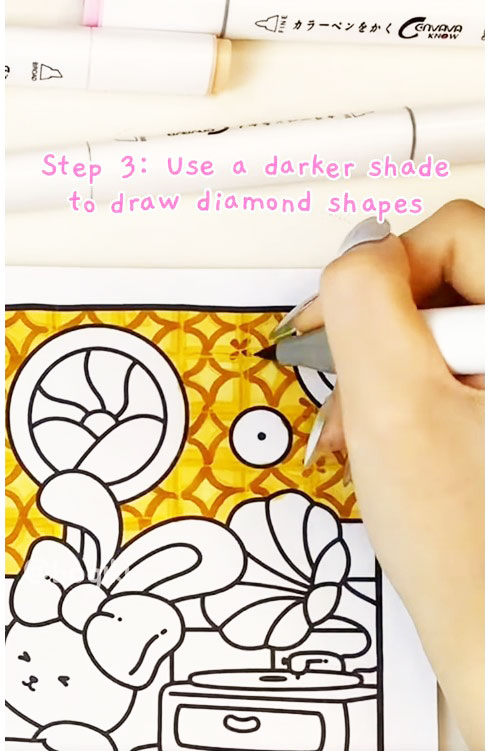
Once the straight lines are in place, it’s time to add some classic vintage flair. Use Dark Brown E914 to draw diamond shapes where the lines intersect. These subtle geometric accents are a signature detail in many retro wall designs. They’ll instantly make your illustration feel more detailed and stylized.
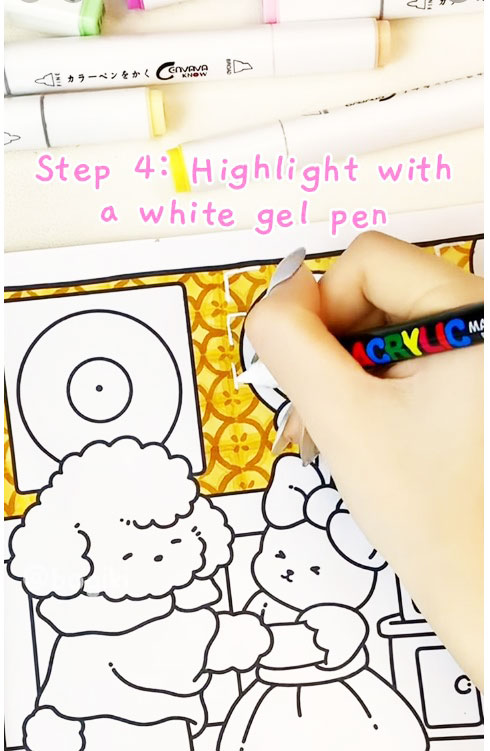
To complete your vintage wall effect, take a white gel pen and gently add highlights to the edges of the diamond shapes and lines. These small touches bring light into the design and make the pattern pop. Be careful not to overdo it—just a few strategic highlights are enough to give the wall a more dimensional and polished look. Now your cozy, nostalgic wall is complete!
Cozy Date Coloring Book by Bogiki takes you on a journey through warm and romantic date night scenes, beautifully captured on every sweet coloring page. Featuring 40 thoughtfully designed date-themed illustrations, this book helps you relax, spark creativity, and savor each artistic moment.
Highlights:
👉 Buy the Cozy Date Coloring Book and enjoy coloring now!
👉 Watch the full real-time video and see the vintage wall coloring tutorial detail now!
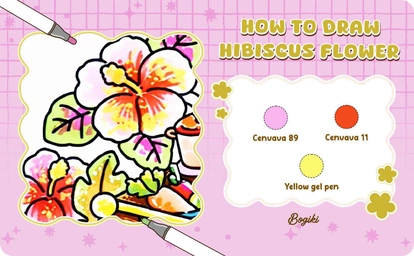
Drawing a hibiscus flower has never been this easy and enjoyable, thanks to Bogiki’s step-by-step tutorial. Each vibrant petal comes to life through expressive lines and cheerful colors. Get your coloring tools ready and dive into the creative journey of how to draw a hibiscus flower with Bogiki today!
To color the vibrant and dreamy hibiscus flower in the Hygge Nook Coloring Book by Bogiki, you can use the following markers:
Ready to bring this charming hibiscus flower to life? In the following steps, we’ll guide you through an easy and fun coloring process using soft blends, bright highlights, and cozy shades—just like in the Hygge Nook Coloring Book by Bogiki. Let’s dive into this relaxing and creative journey together!
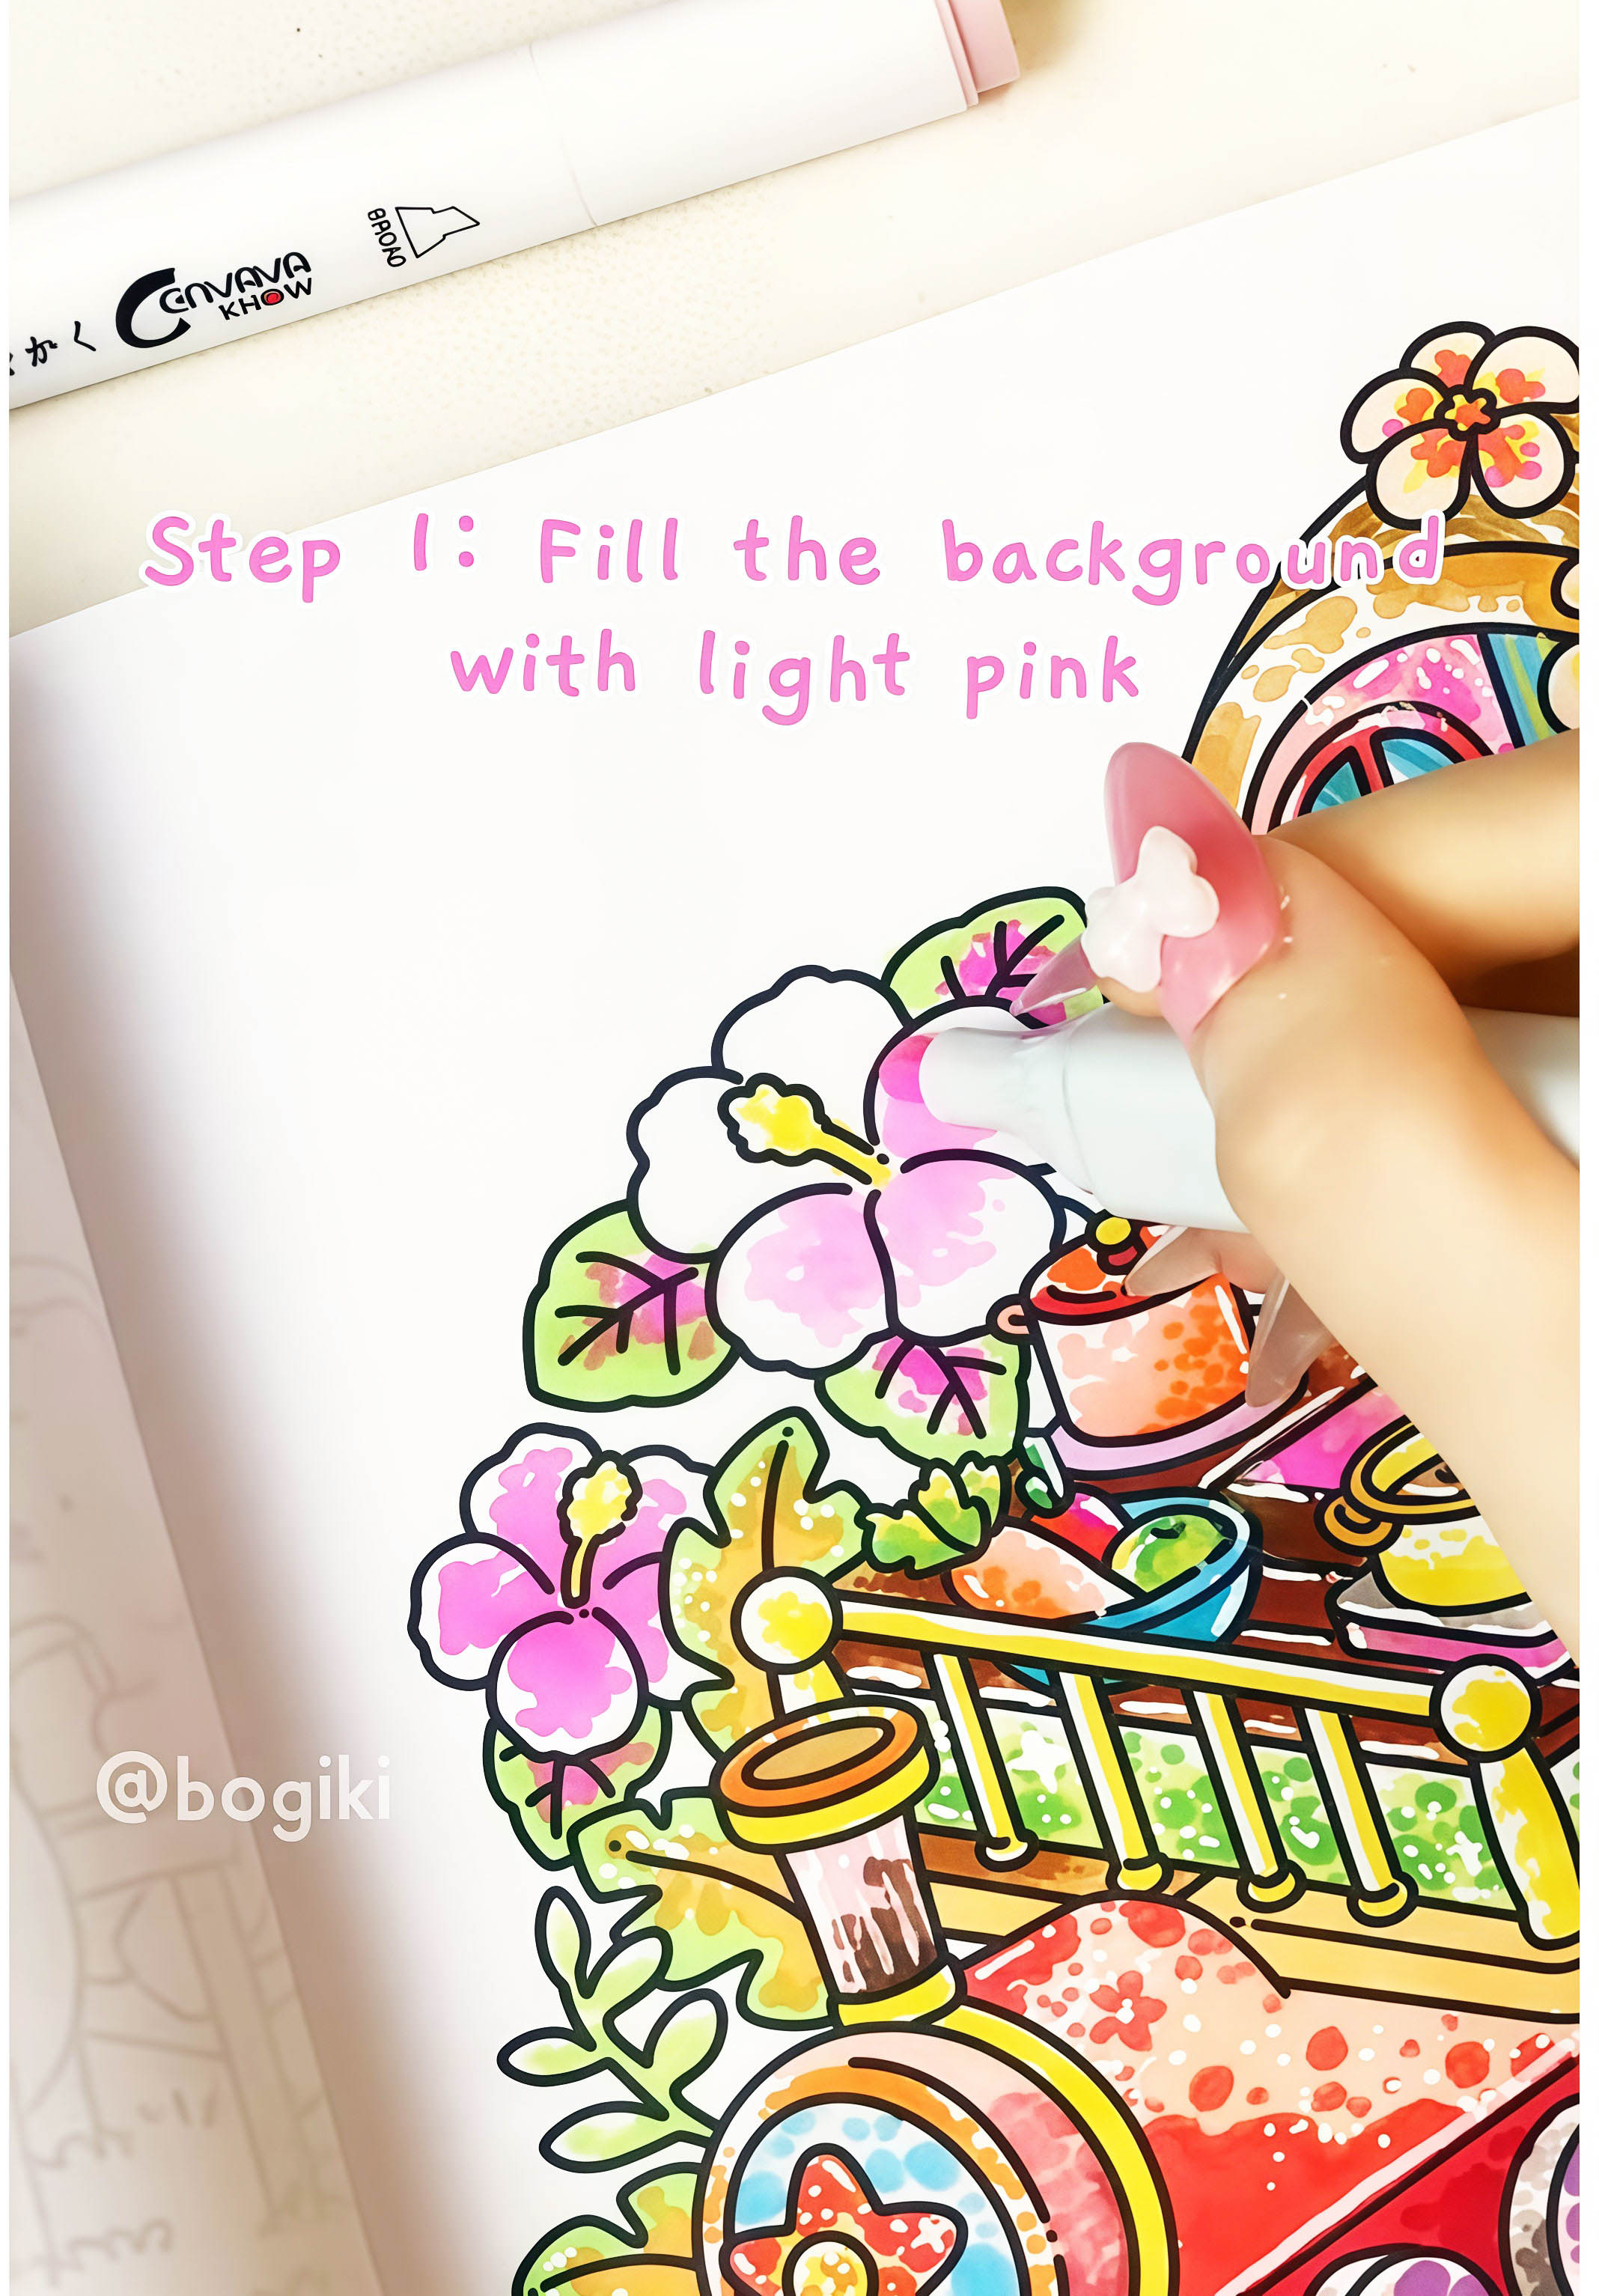
Begin by gently filling the background around your hibiscus flower with a soft light pink shade. This step helps create a warm, dreamy setting that makes the flower stand out beautifully. Use Cenvava Marker 89 to achieve a smooth and even color blend, making sure to avoid harsh edges for a more natural look. Take your time here—it sets the mood for the entire piece.
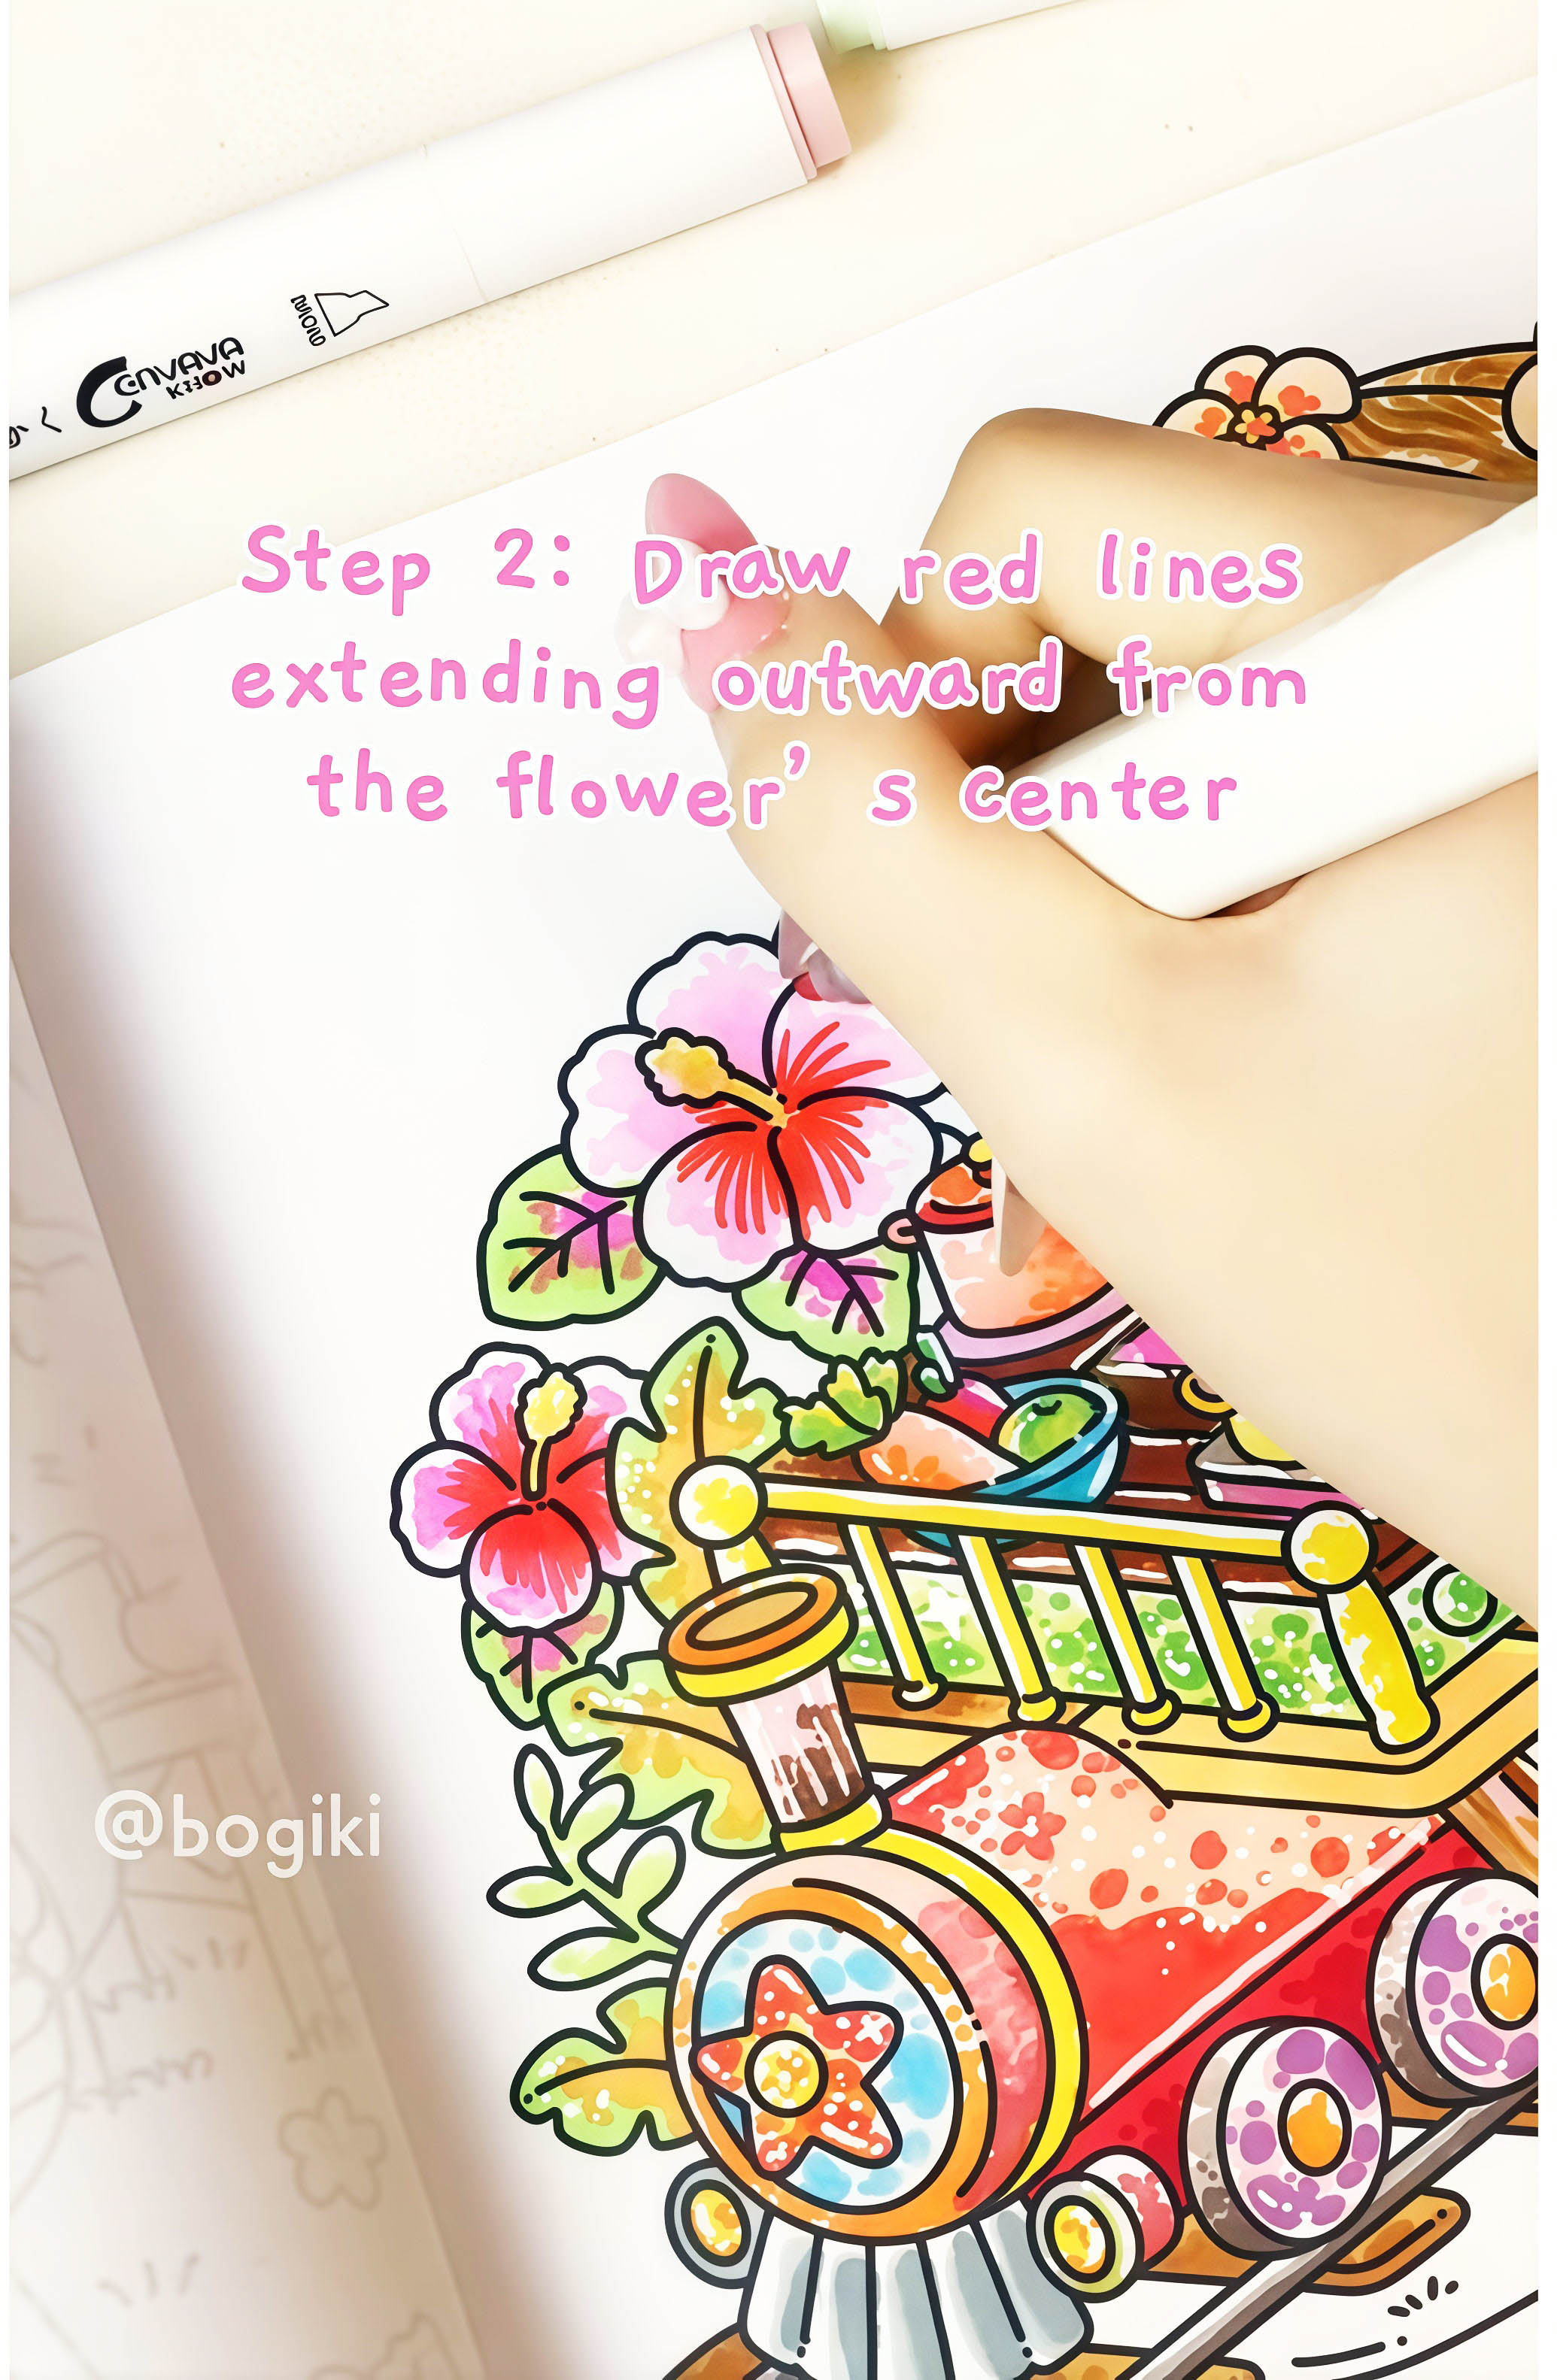
Once your background is ready, start adding fine red lines that stretch outward from the center of the hibiscus flower. These lines mimic the flower’s natural veins and help add depth and movement to each petal. For a vivid and clean effect, go with Cenvava Marker 11, applying light, controlled strokes that follow the curve of the petals. This detail brings life and dimension to your flower.
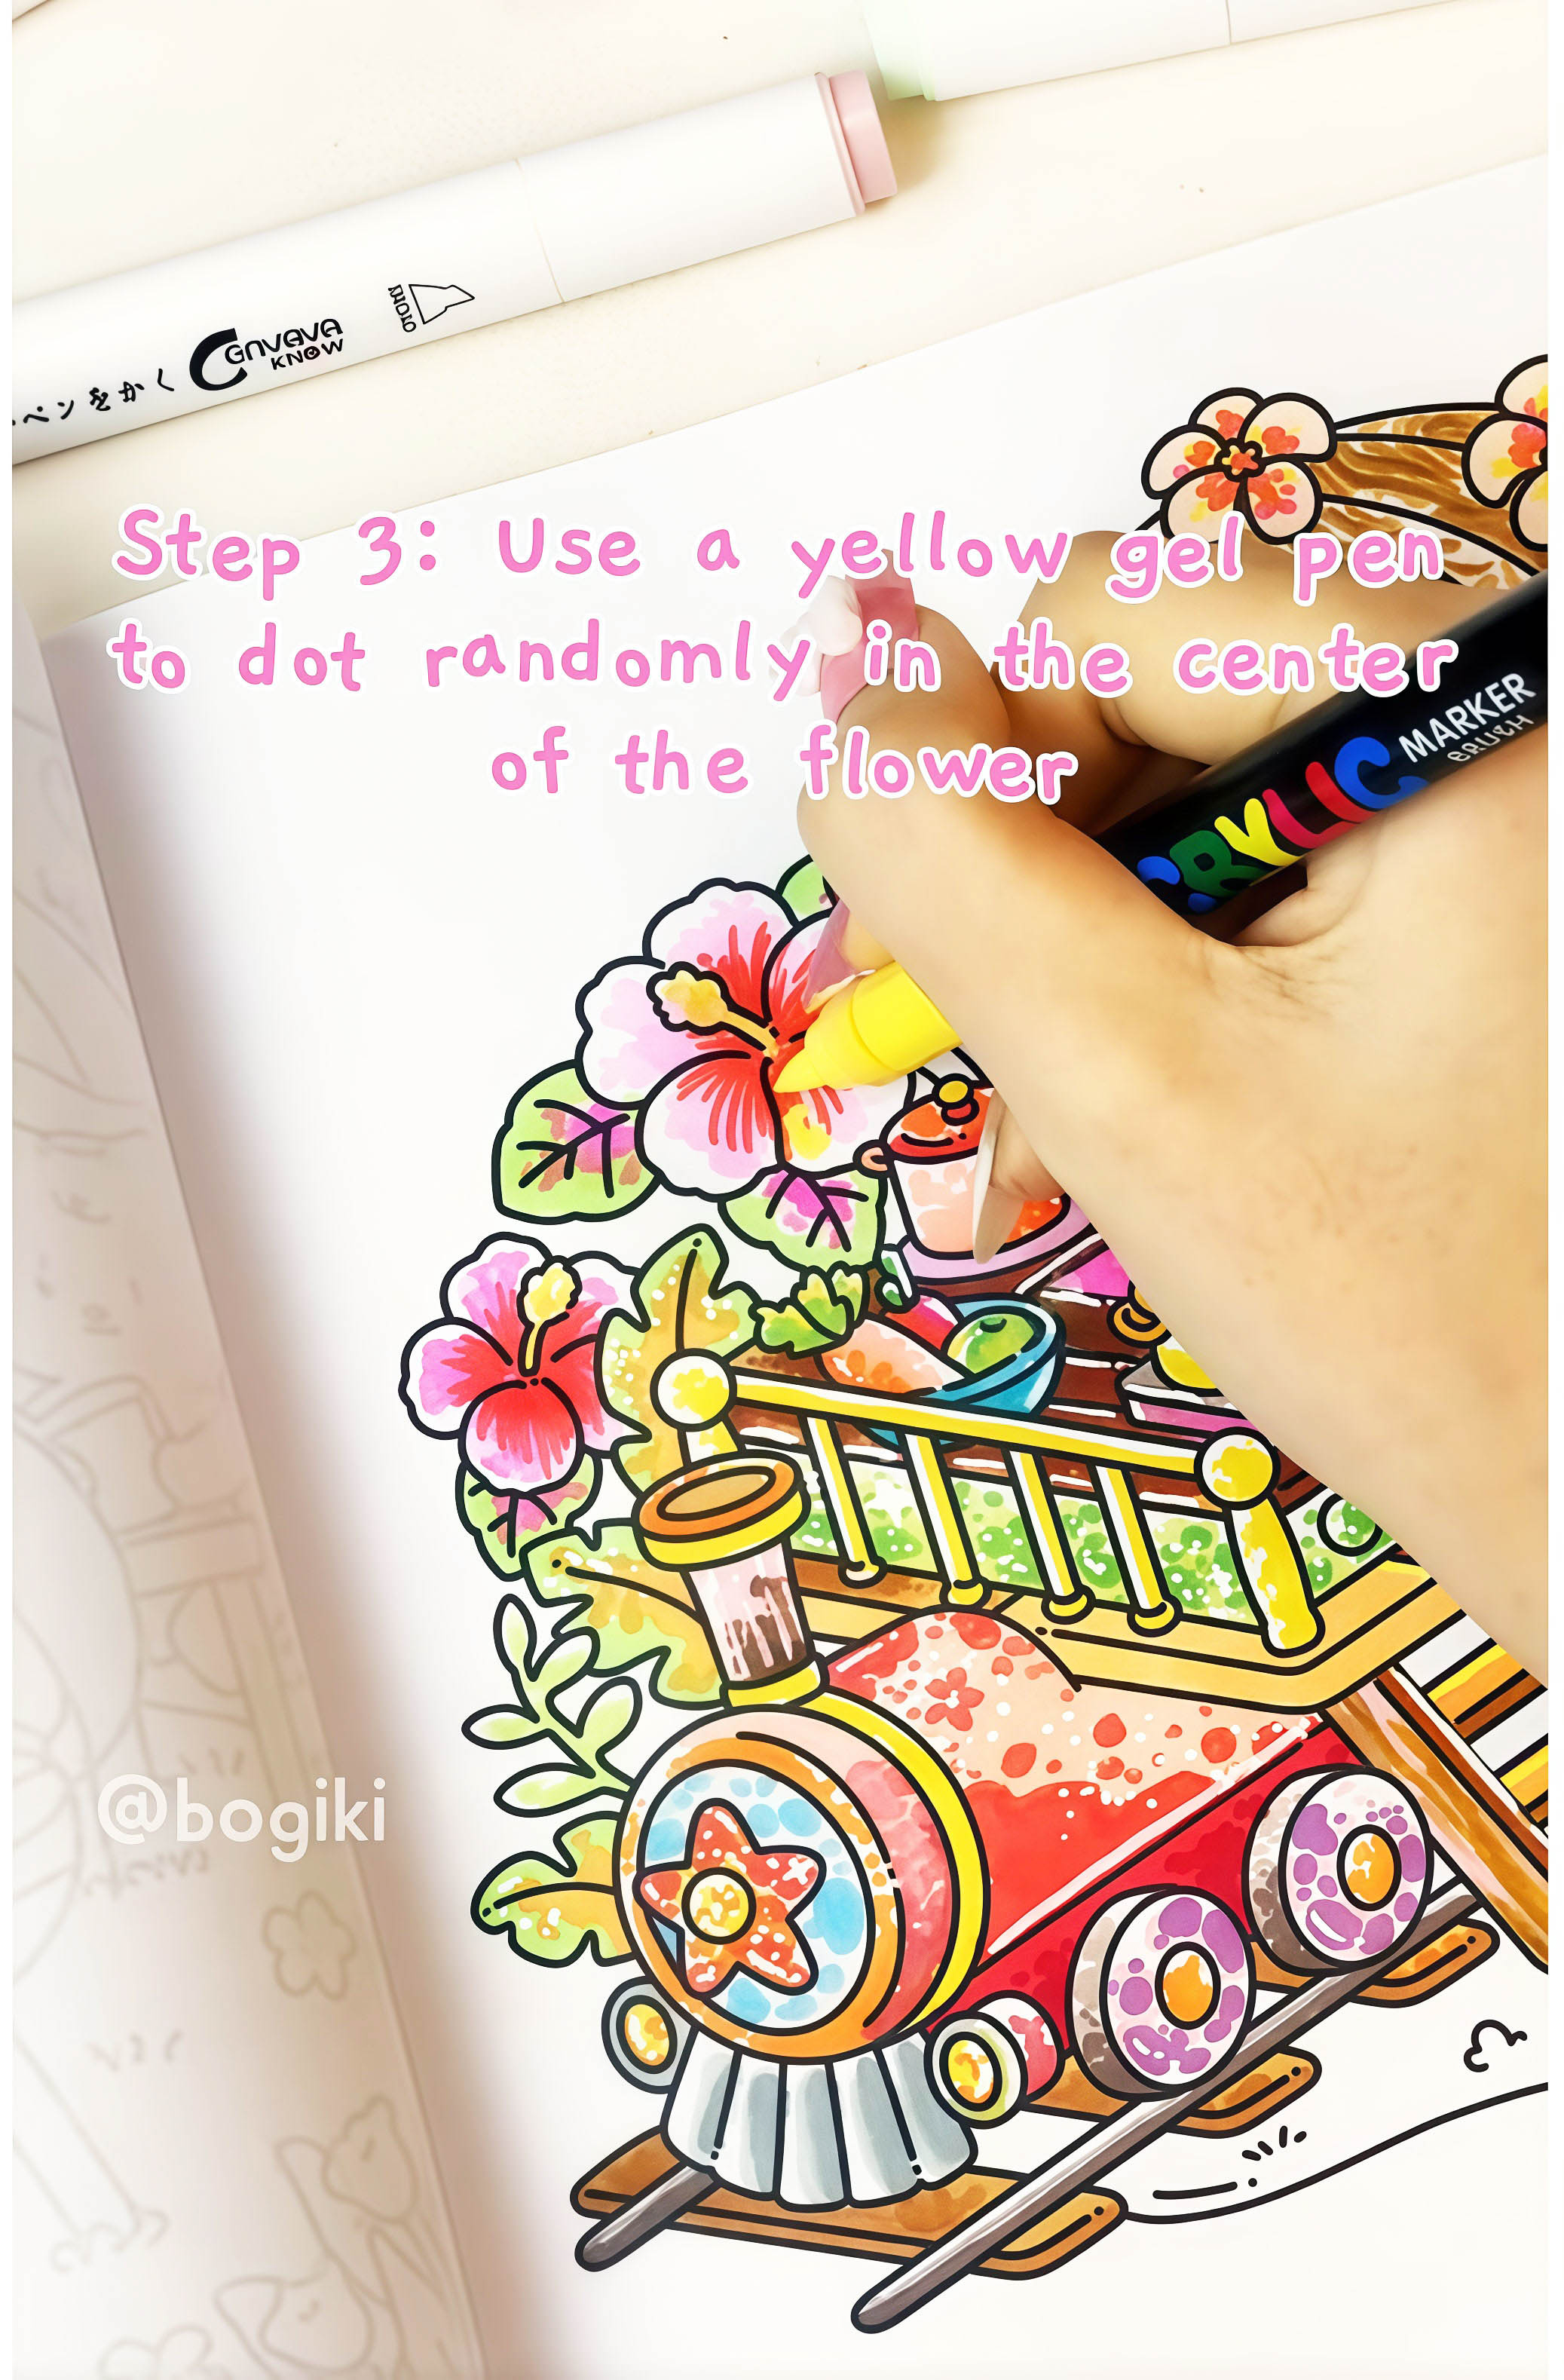
To finish your coloring, add a sprinkle of charm by dotting the flower’s center with bright yellow accents. These small dots represent the pollen and give your hibiscus a lively, realistic touch. A yellow acrylic gel pen is perfect for this step, as it offers precision and a slight shine that draws the eye. Place the dots randomly but with balance to keep the look natural and harmonious.
Step into the whimsical world of a spirited girl who turns everyday moments into pure magic! This delightful coloring book invites you to join her and her adorable crew as they uncover joy in life’s simplest pleasures—from cozy corners and steaming mugs to starry-night musings in snug little spaces.
Inside, you’ll find:
👉 Buy the Hygge Nook Coloring Book and enjoy coloring now!
👉 Watch the full real-time video and see how to draw a hibiscus flower detail now!
Treat your inbox to a lovely surprise! Sign up now for exclusive content and special gifts
1311 Park St Alameda, CA 94501
+1 (945) 215- 8881
studio@bogiki.com
*Currently, we are unable to handle your call/voicemail/phone message. Please go to our Contact Form and leave an email.


